

Today’s Blogmas post is a collaboration topic – we’ll all be posting DIY projects. My DIY will be a version of the Swarovski Stardust jewellery:

You’ve probably seen these being advertised by Miranda Kerr. They’re beautiful but the retail price for the Stardust necklace is $99 and the bracelet is $59 😮 I’ll show you how to make your own for a fraction of that price!
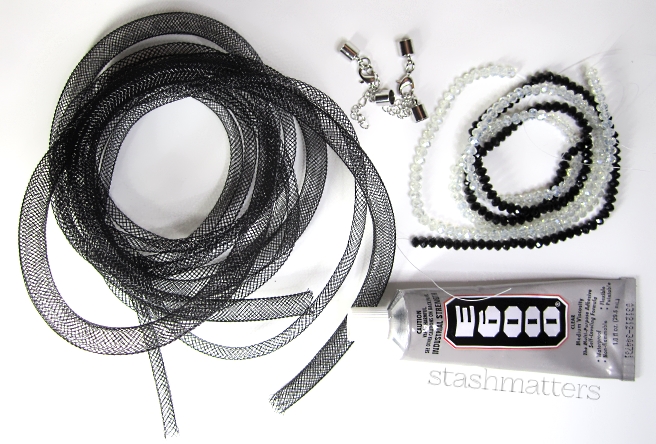
Materials and tools:
• nylon mesh tubing (I used the 4mm for the necklace and 9mm for the bracelet)
• 3mm faceted glass beads (how many beads you need depends on how thick and long your project will be – the necklace needed one-18″ strand and the bracelet also required one-18″ due to it being thicker)
• round metal end caps and clasp
• E6000 Craft Adhesive
• scissors
• tape
• small bowl
• paper towels
• toothpicks

Instructions:
1. Cut required length of nylon mesh tubing – I wanted a 18″ necklace and 7″ bracelet so I cut 20″ and 9″ to give some slack
2. Pour beads into small bowl

3. Tape one end of the nylon mesh tubing
4. Insert beads into the nylon mesh tubing 1 at a time for the 4mm tubing (necklace) or pour beads into 9mm tubing (bracelet) until desired length is reached [the 4mm tube will fit just 1 bead across whereas the 9mm tubing will fit 3 beads across]

5. Ensure beads are distribute evenly and trim ends of mesh tubing to leave 5mm on each end

6. Squeeze E6000 glue onto paper towel and use toothpicks to apply glue to each end of mesh tube
7. Push mesh tubing ends into the metal end caps – hold for 30 seconds each to ensure adhesion

8. Leave glue to try for 24 hours before wearing
You can make these as a gift or for yourself! The possibilities are endless – the nylon mesh tubes come in a variety of colours and sizes, and the beads inside can be any colour or combination of colours – I’ve seen beautiful necklaces with gradiation of rainbow colours.

Total cost: for necklace: $6.50, for bracelet: $5.75 😀
Even Avon has their own version, but still not as cheap – or as special – as the handmade version. 😉 Would you consider making your own Stardust jewellery?

Be sure to check out the rest of the Babes in Blogland for their Blogmas DIY projects:
♥ Ingrid of Curly.Spring.Blossom
♥ Sharon of Sharon Beauty Prime
♥ Kaily of Hello Kaily


Great project. I love the originals, but they are a little expensive. This is such a great way to get the same effect for a fraction of the cost 🙂
LikeLiked by 1 person
I LOVE trying to (mentally) take apart jewellery that I see, knowing that they can be made for much cheaper! In this case, I really do NOT need Swarovski crystals inside the mesh tubing – the glass beads sparkle just as nicely. 🙂
LikeLiked by 1 person
Gorgeous! So pretty! ❤
LikeLiked by 1 person
Thanks! 🙂
LikeLiked by 1 person
I’m not a huge fan of the originals, but your DIY looks really good!
LikeLiked by 1 person
Thanks! I think the originals are TOO flashy. I like the smaller strands – whenever I wear mine people ask where I got it from. And when I tell them I made it, they want me to make one for them. So the bracelet and the necklace I made for this post are Christmas presents! 🙂
LikeLiked by 1 person
Haha that’s awesome! Great for gifting, too. It’s really nice getting homemade things 🙂
LikeLiked by 1 person
So clever ! So beautiful ! I’m in love 😀
LikeLiked by 1 person
I’m making a list of items you like / want so I can make them for you one day! 😛
LikeLiked by 1 person
You must have gathered a long list already ! 😛
LikeLike
Wow, these are really pretty and you make it look so easy!
Would love to see more DIY jewelry ideas from you! I’ve been casually browsing possible jewelry ideas to give my girlfriends as bridesmaids gifts and realized the prices really start to add up. If I could make something myself for a fraction of the cost, that would be awesome. Unfortunately, I don’t have a jewelry-making bone in my body! 😛
LikeLiked by 1 person
Maybe you can take a class at Michaels! It’d be really thoughtful to make jewellery for your bridesmaids! 😀 I think something even simple like a chain with a pendant could be doable for a noob like you! 😉
LikeLiked by 1 person
Amazing! That’s so pretty. Love this idea. 😀
LikeLiked by 1 person
Thanks Sharon! 😀
LikeLiked by 1 person
muak!
LikeLike
Those are really neat! The black one especially looks pretty legit.
LikeLiked by 1 person
Yeah the black ones are my favourite. I find the lighter colours to be too bling for me but my friend likes it, so those are for her!
LikeLike
Woah!! That’s awesome 😍👍🏻 it looks even better !! I love diys they are so much fun!:D I might definitely try this out!
LikeLiked by 1 person
You could get a lot of this stuff from MICHAELS! D The only thing they might not have is the nylon mesh tubing.
LikeLiked by 1 person
Yes you can!! It’s amazing lol. Maybe hobby lobby!? I think I want to make some lol darn! 😛
LikeLiked by 1 person
We don’t have a lot of craft store options here, I wish we had Hobby Lobby and Jo-Anne’s. I hear about them and I wish I could visit! We only have Michaels as the chain craft store.
LikeLiked by 1 person
Awe !! I hope you get more soon! We only have 1 michaels and 1 hobby lobby. That’s how small my city is lol
LikeLike
What a great idea! Thanks for sharing your DIY version.
LikeLiked by 1 person
Thanks! 🙂
LikeLike
Awesome! This is totally Pinterest board worthy 🙂
LikeLiked by 1 person
Aww thanks! That’s so nice of you to say. 😀
LikeLike
Very pretty!! You should make jewelry and sell it! 🙂 xo
LikeLiked by 1 person
I like to make them as gifts – if I sell them, I feel like it would take the enjoyment out of it! 🙂
LikeLiked by 1 person
True!! You’re so very talented! 🙂
LikeLiked by 1 person
Thank you Katie! 😊
LikeLiked by 1 person
You’re welcome hun! 🙂
LikeLike
I put these in my winter wish list post and have directed a few people to it doe ideas. I really hope no one gets me these as this is a January diy waiting to happen! Love the blue version!
LikeLiked by 1 person
YES, you TOTALLY need to make this! The blue one is really pretty – the sky is the limit really.
LikeLiked by 1 person
Good job making them on your own! You go girl.
LikeLiked by 1 person
Thanks GIRL! Are you catching up on my blog lol?
LikeLiked by 1 person
I gotta, man.
LikeLiked by 1 person
So impressive! Great job. I’m in awe of your craftiness! I like doing crafty things but I find it so hard to dedicate time to it. I may attempt to make a wreath this weekend but we’ll see. 🙂
LikeLike