

This is part deux of “How I wash my brushes” entry. As I mentioned in that post, I used to simply lay my brushes flat to dry them after they’ve been washed. But with advancement in the technology of makeup brush care, I have improved my methods!
First up, my eye shadow brushes. I found this nifty art brush holder at the dollar store:
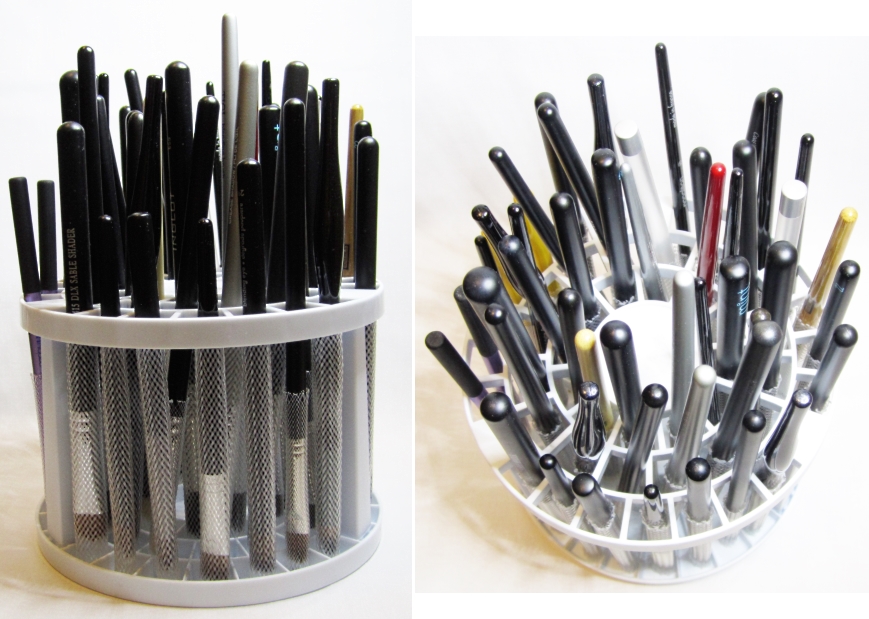
In the promotional images, the art brushes are placed with the bristles facing up for storage, but for the purpose of drying my brushes, I face them down – but with brush guards protecting the bristles. This is key. Don’t just put the brushes facing down and smooshing the bristles. The purpose of drying my brushes with the bristles facing down is to let gravity do some of the work: it prevents moisture from getting trapped in the ferrule (the metal part of the brush, where the bristles are glued in place). If moisture gets trapped in the ferrule, it can weaken the glue and cause the hairs to fall out. With this brush holder, I can fit 49 eye shadow brushes, and the whole set up can be taken apart completely for compact storage.

Speaking of Brush Guards – they’ve been a lifesaver for preventing the brush hairs from splaying and keeping the brush head shape looking like new. I slip one guard on each brush after I wash them, sliding down from the handle onto the bristles. I have a variety of sizes from the original Brush Guards – the plastic they use is thicker than the cheap knock-offs so they retain their shape better. I’ve had mine for years and they’re definitely worth the investment. If you absolutely refuse to buy brush guards, you can always wrap strips of paper towel around each brush head while they’re wet.
To dry my larger brushes (blush, powder, foundation), I use the brilliant Benjabelle Brush Tree:

This thing is godsent. It is well made and well designed. I have the original model, and at minimum, it can hold 14 brushes. It can also hold multiple smaller brushes per opening. The silicone openings grip the brushes securely, while having enough flex to allow the brushes to slide out with ease for removal. The body of the brush tree is made of a thick sturdy plastic – I have this in black but it is also available in white and pink. I have nothing bad to say about the Benjabelle Brush Tree – at $35 USD it may seem expensive, but for me, keeping my brushes in tiptop shape is worth it. There are other models available to suit different needs – I’ve even purchased a few for my friends as gifts! The contraption can be easily collapsed and stored flat.
A portion of my brushes still get the ol’ lay down on a towel to dry method – mainly my stubby kabuki brushes – since they don’t fit into the brush tree:

I prop a rolled up towel on one side so the brushes lay at a slight downward angle (around 160°) to help water run down the bristles and away from the ferrules. I let the brushes dry overnight and most are ready for use by morning.
There you have it, how I wash and dry my brushes. I hope this has given you some ideas. What’s your method to dry your brushes?

Great post. Those drying contraptions look useful, but do you also use them to store clean brushes? Otherwise, where do you keep it? I would consider getting it if it folded to something smaller.
LikeLiked by 1 person
I only use these contraptions to dry my brushes, not to store them. They both collapse so that they’re completely flat. Here’s what the Benjabelle tree looks like flat:

LikeLike
Btw I nominated you for the Beautiful Blogger Award! Check it out 🙂 https://styledwithjoy.wordpress.com/2015/03/24/tag-tuesday-beautiful-blogger-award/#more-880
LikeLiked by 1 person
Oh wowee! Off to read now! Thanks chikita!
LikeLiked by 1 person
I just dry mine with the brush heads hanging off the edge of a towel, this looks pretty cool!
LikeLiked by 1 person
I used to do that too but I was running out of surface area to lay all my brushes out when I do a big batch of them at a time. I also find that having the brushes dry vertically help them dry faster due to gravity doing some of the work!
LikeLiked by 1 person
Genious! I’ve never thought of using a brush carousel with the brushes inverted! I dry mine off the edge of a towel too but then again I’ve also ruined a few this way.
LikeLiked by 1 person
Glad you were able to get some ideas from the post! May your brushes last forever and ever…! 🙂
LikeLiked by 1 person
i ❤ my benjabelle 😀
LikeLike
i need to get more brush guards so happy for the link 🙂 Thanks!
LikeLike